- Newbie FAQ
- Your first steps
- Mystats: Attributes of your Character
- Stats: Setting Up Str, Dex, Int
- StatAndOtherCaps
- UOSteam
- Imbuing Guide
- Basic Imbuing
- ImbuingMaterials
- Complete Crafting Guide
- Champions
- Mini Champs
- Pandora Coin Mobs
- Oceanic Coin Mobs
- Peerless Bosses
- Named Monsters
- Rune Codex Guide
- Plant Guide
- Slayer Guide
- SlayerShortList
- Age of the Infested
- Void Pool
- DoomGauntlet
- TreasuresOfTokuno
- New Player Boss Trammel
- Weapon Abilities
- Weapon Properties
- Magery Guide
- Chivalry Guide
- Necromancy Guide
- Spellweaving Guide
- ArtifactLocations
- Pure Mage Guide
- PvM
- PvP
- HouseDecay
- AncientPandoraChests
- Newbie FAQ
- Starting up
- Your first steps
- New Player Boss Trammel
- Mystats: Attributes of your Character
- Stats: Setting Up Str, Dex, Int
- Basic Imbuing
- Blacksmiths & Tailors
- Combat
- Training
- PvM
- ItemTiers
- Guilds & NPA
- First Earnings
- Death
- Interesting places to hunt
- external pages to help new players
- Path of Combat
- Path of Magic
- Path of Crafting
- Path of Gathering
- Path of Nature
- Path of Shadows
- Skill Guide
- Imbuing Guide
- Basic Imbuing
- Thief Guide
- Magery Guide
- Chivalry Guide
- Necromancy Guide
- Spellweaving Guide
- Pure Mage Guide
- PvP
- ItemTiers
- Player Commands
- Player Races
- StatAndOtherCaps
- Bulk Order System
- Complete Crafting Guide
- Complete Pet Guide
- Battles
- Unique Monsters
- Item Colors
- Loyalty System
- Player vs Monster
- Champions
- Mini Champs
- Peerless Bosses
- Named Monsters
- Age of the Infested
- Slayer Guide
- SlayerShortList
- Player vs Player
- Veteran Rewards
- Pandora Coin System
- Pandora Coin Mobs
- Void Pool
- DoomGauntlet
- TreasuresOfTokuno
- New Player Boss Trammel
- Rune Codex Guide
- Pandora Housing
- Sea Coin System
- Oceanic Coin Mobs
- Quest Guide
- Pandora Grand Casino
- Donation FAQ
- Treasure Hunting
- ArtifactLocations
- ImbuingMaterials
- Weapon Abilities
- Weapon Properties
- Plant Guide
- Vehicles
- HouseDecay
- AncientPandoraChests
Introduction
Ultima Online Steam (UOSteam, Steam) is a third party program such as Razor. It allows you to use it as a client launcher program, to log into Ultima Online. Steam also provides you with settings to get a better game experience, change some game settings and use hotkeys (similar to Razor or client hotkeys, but much more specific and more complex) for all types of spells, weapon abilities, equip or unequip items/gear and other actions. Finally you are also able to create Steam macros (scripts), making it possible for you to run actions automatically.
Of course Steam is allowed on Pandora. The following guide will help you downloading, installing and setting up Steam the way you want it to be. If you have any more questions please contact a player in game or ask in the forums. The Admins and GM's of Pandora are not responsible for anything connected to Steam. So any issues, bugs and problems related to this program are not a Pandora related problem. It is your responsibility using Steam and fixing settings or macros!
Also keep in mind that using Razor could cause problems, so it is highly recommended that you switch to Steam if you don't already have. It is possible to run both Steam and EasyUO simultaneously.
If you install Steam, please do this as Admin in your Windows OS (Windows 7 or Windows 8 or Windows 10). Also: After installing Steam (see below) please run the program as Admin!
Downloading and Installing UO Steam
You can download UOSteam directly from the Pandora Website: http://www.pandorauo.com/portal/#play
1. Scroll down. Find 4. Download UO Steam and click the blue button, then click OK to confirm your download. The file will be saved as a .rar file in your default download folder.
2. Go into your default download folder and find the requested file. Click right on that file and unpack it to a location of your choosing. (It is not important where UO Steam is saved. Usually you'll find it in your Program Files on C:\.)
3. After unpacking the file: Right click the setup file and run it as Administrator, then follow the instructions.
Visual C++ Redistributable for Visual Studio
It may be possible that your UOSteam is getting you error messages and/or just won't start right away. Don't panic. There is a solution:
Usually this happens if you have a false or not properly updated version of the Visual C++ Package on your computer. In these days normally every Windows (such as Win 7 or 8) is a 64 bit system, so it needs the correct files to run some applications and programs such as UO Steam. Therefore you'd have to download and install the Visual C++ Redistributable files. Don't worry, it will not mess with your PC or change anything that could cause problems running your system.
Download the file package here: http://www.microsoft.com/en-us/download/details.aspx?id=30679
After downloading double click the setup file and follow the instructions.
If this is causing problems with running UO Steam and if it still doesn't work, you can check this website to solve any problems:
Starting UOSteam for the first time
Before you start Steam the first time there are some things to take care of:
1. Right click on the Steam shortcut on your desktop
2. Click Properties
3. Click on Compatibility
4. Check the box at Run as Administrator
5. Check the box for Compatiblity mode for Windows XP Service Pack 2
6. Check the box at Disable Desktop Design
7. Click Save and OK
8. Start UOSteam by double clicking the shortcut symbol
9. Follow the next steps carefully
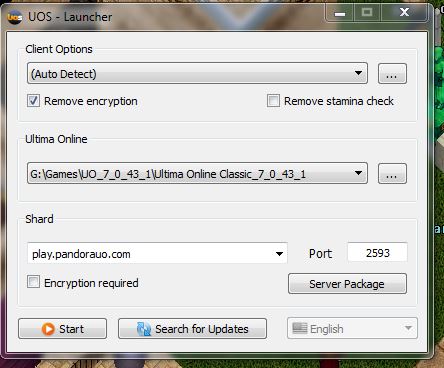
Basic Settings for UOSteam to log in on Pandora
After double clicking the shortcut symbol Steam will start and you will see a box with different settings and options. Please do exactly as described below.
1. In the first blank drop down list/field use Auto Detect. If this does not work for you: Browse to your UO folder (Example: C:\Program Files\Electonic Arts\Ultima Online\) and find the client.exe. One click it. It will show up in the drop down list now.
2. Browse to your UO Folder. It will show up in the drop down list now.
3. Set up server and port as shown in the image.
4. Check the box Remove Encryption at the top.
5. Do not change anything else here.
6. Click START and log in on Pandora. You can now change all the settings, set up hotkeys and macros while you are in game.
Basic Settings for UO Steam
After logging in you will see a lot of different tabs in UO Steam. Some of these tabs use also sub taps. The following will describe the basic settings step by step.
1. GENERAL TAB
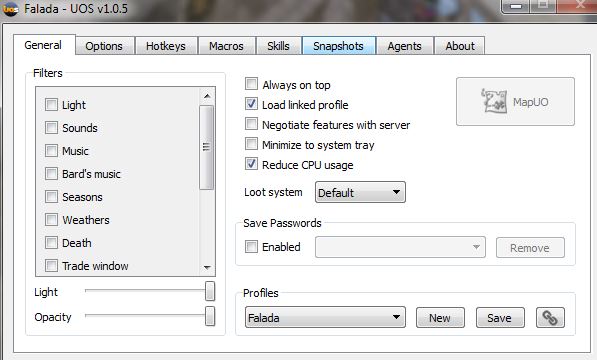
- Check Reduce CPU Usage
- Set up a new Profile if you plan to play more than one character. Remember: You have to save each Profile after changing settings, macros and hotkeys! Therefore click SAVE under the General tab. It will save the Profile you are currently using!
- You can play around with the Filters, but it is not vital for your gameplay.
2. OPTIONS TAB, GENERAL
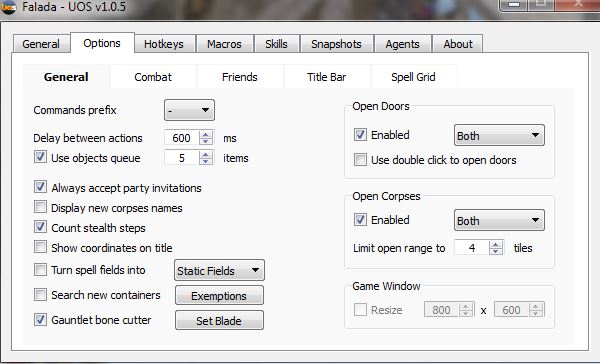
- Check Use Objects Queue. Try something between 500 and 600 ms. If you are experiencing queued action problems, change the values up or down and check again. Try using something between 5 and 10 items; usually 5 is okay and not causing problems.
- Follow all settings shown in the image.
- About the Bone Cutter: You will find this very useful in the Gauntlet (Doom), fighting the Dark Fathers. If you activate the Bone Cutter UOSteam will ask for a blade. Switch in game and target and click on a bladed weapon to cut bones automatically.
3. OPTIONS TAB, COMBAT
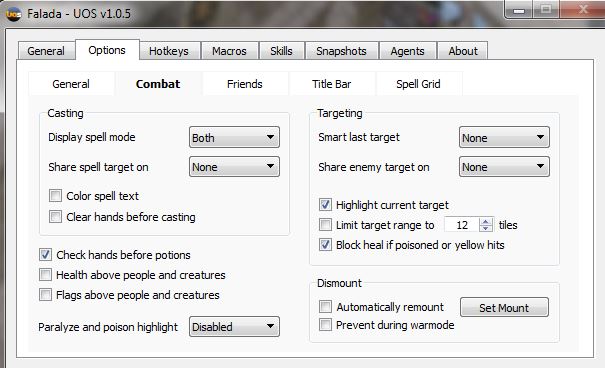
- About Check Hands before Potions: This will make sure that you are able to use potions when using a weapon the same time.
- About Block Heal if poisoned or yellow hits: It is very important to activate this feature!
- About Dismount: Prevent during war mode: This will prevent you from dismounting when you accidentally click yourself while in war mode.
4. OPTIONS TAB, FRIENDS
You can activate the bandage healing here. This works but we would not recommend it. There are other ways - one is an EasyUO Script - that work faster and use bandies automatically, too. If you decide to use this function of Steam you'll have to play around with the settings and timing.
5. OPTIONS TAB, TITLE BAR
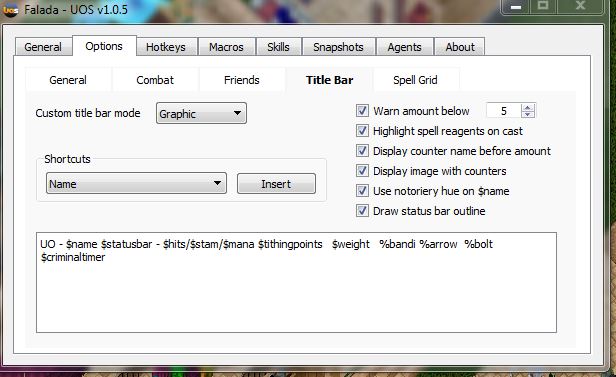
Here you can set up hitpoints, stamina, mana, amount of reagents, ammo and other things.
Hotkeys
Hotkeys are the way to play the game. Similar (but way more complex and comfortable) as in Razor or in the game itself the hotkeys make you able to execute specific action by pressing a key or combination of keys on your keyboard. Remember: After changing hotkeys you need to SAVE YOUR (SPECIFIC) PROFILE!
1. Setting up a Hotkey in Steam
To set up a hotkey choose the requested tab under the HOTKEYS TAB, click the action. Then on the right side of the window click the blank text box. Hit the key you want to use. Check Pass to UO and click SAVE. (If a key is already in use, Steam will give you a message.)
IMPORTANT: Do not use the same key you are already using in the game itself! Also: For weapon abilities we recommend to set up the hotkeys, if you are playing a Gargoyle (see down below). If some key settings do not work, please ask in the forums or in game for further instructions!
2. Toggle Hotkeys
If you set up a hotkey to toggle hotkeys, you can turn your hotkeys on and off. This is to prevent spam when you are just typing ingame. If the hotkeys are off, nothing else will happen if you press a specific key. Turn them on to use your hotkeys.
This is the first hotkey you can set up if you click the HOTKEY TAB.
3. Hotkeys for Spells
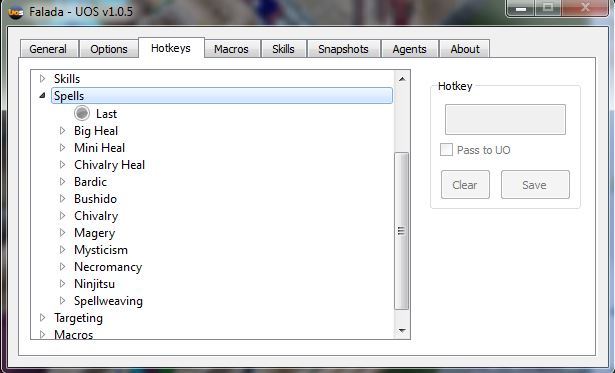
You can set up hotkeys for all the spells in Ultima Online (Bardic does not exist on Pandora!). It is recommended that you set up keys that are easy to rech for you, depending on your style of play, how you use your hands on the keyboard and your general priorities.
Self Heal
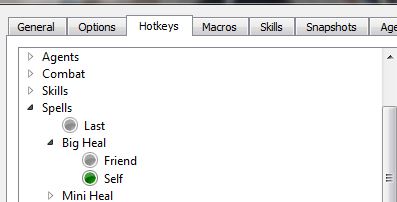
In Steam there is a special option (under Hotkeys) to set up a self heal. You can use Magery or Chivalry. If you press the key you set up for the self heal you will instantly target yourself automatically (it is not necessary to press any target hotkey) and heal yourself.
For Magery, Greater Heal Self: HOTKEYS, SPELLS, BIG HEAL, SELF. Set up a hotkey and save it.
For Chivalry: HOTKEYS, SPELLS, CHIVALRY HEAL. Set up a hotkey and save it.
If you are poisoned, pressing that hotkey will first cure you and then heal you. (This only happens if you set up Block Heal if poisoned as described above.)
4. Hotkeys for Weapon Abilities
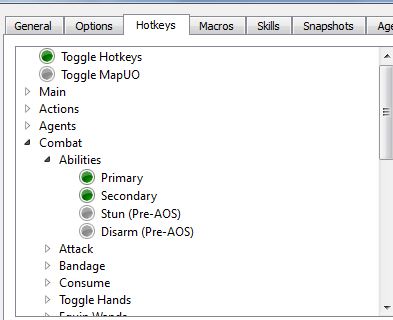
Set up hotkeys for primary and secondary weapon ability. If an ability does not work (and the weapon is not bugged) you have to use hotkeys in the game (client hotkeys under Options) or change a file in Steam (especially when playing as Gargoyle), as described below.
5. Using potions, apples
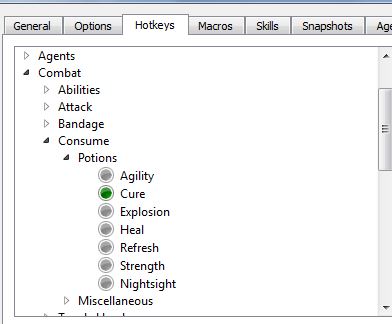
You can set up hotkeys to use potions and enchanted apples, also other consumables:
HOTKEYS, COMBAT, CONSUME, POTIONS
and
HOTKEYS, COMBAT, CONSUME, MISCELLANEOUS
You may have to open and close your potion bag one time after logging in!
6. Skills
You can also set up hotkeys to use some of the Skills:
HOTKEYS, SKILLS
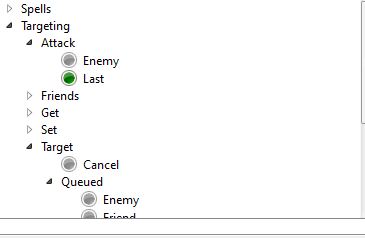
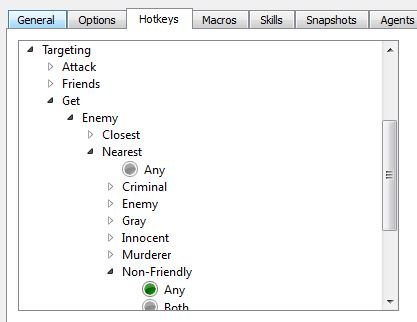
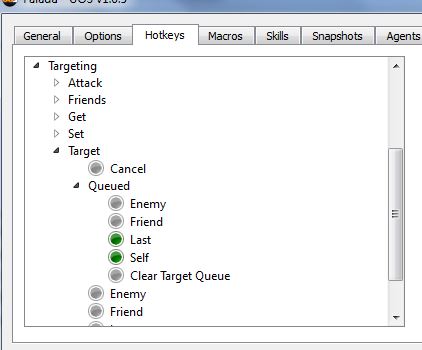
7. Targeting
Follow the images to set up keys for targeting.
About Targeting
1. Attack Last: If you press the hotkey you will attack the last target (this can also be a friendly target, be careful!) you chose.
2. Switch through close enemies (TARGETING, GET, ENEMY, NEAREST, NON FRIENDLY, ANY): By pressing the hotkey you can switch between close enemy targets and choose one as your current and last target. This works the same for friendly targets as seen on the images (TARGETING, GET, FRIEND, NEAREST, ANY) that are not grey or red.
3. Set Last: This hotkey makes you able to determine your last target, friendly or criminal.
4. Last (TARGETING, TARGET, QUEUED, LAST or SELF): Press one of the two hotkeys to target yourself or another target. You have to press this key in between any action you want to execute on yourself or your last target (spells), except for weapon abilities (these work against your target as long as it is in target).
Macros: General Information
As in Razor you can set up macros to run specific actions automatically. These macros are also called scripts. In the blank text box you can put in commands to execute specific actions. It is recommended that you add pauses between some of these actions, to prevent errors and queuing issues. Also: Remember to save any changes in a macro and also save your profile after changing or setting up steam macros!
It is not possible to run more than one macro at the same time. But you can switch between macros by using a command at the end of a macro. It will start the macro you requested via that command.
Setting up a Macro
1. Click the MACRO TAB in UO Steam
2. At the bottom, click NEW
3. Name your Macro (however you like it)
4. Write your macro into the blank text box, using your experience, by copy and paste a text file or using the command list
5. Set up a hotkey in the blank text box if necessary
6. Check Loop and Do not Auto Interrupt if necessary
7. Click SAVE
You can test a macro by clicking PLAY on the right top side. If an error occurs Steam will give you a message, also sending you the number of the incorrect command line, maybe also some other information.
What does LOOP mean?
If you check Loop the macro will run constantly, until you start another macro or stop the current macro. Looping is useful when you are running macros to do Heartwood quests or macros that activate abilities and protect you during PvM and champ spawns. Also you might want to create a macro that observes your health status and activates counter measures when you are getting damage, debuffed or mortalled. These all should run in a Loop.
What does DO NOT AUTO INTERRUPT mean?
If you are running looping macros you should always check this option to prevent unforseen interruptions.
The Object Inspector
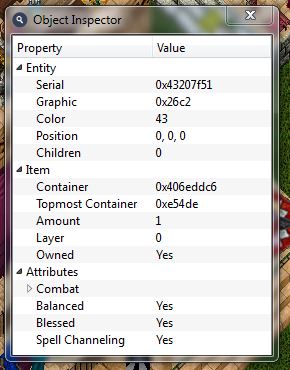
Under the MACRO TAB at the bottom you find the Object Inspector. You can start it if no macro is running. The Object Inspector shows you all the ID's and specifics you need to know about a particular item. Click Object Inspector and then target and click the item you want to take a look at in game.
For some commands/actions your specific macro needs Serial, Graphic, Color and Container ID's. You can find these via the Object Inspector. These ID's are needed if you want to use specific items (such as potions, apples etc.) automatically.
Macros: Commands
Commands

If you click Commands under the MACRO TAB you find an overview of commands you can use in Steam Macros. There is no definition in this list what a command does. But you will find out and learn how the steam commands work and what they do, by time, testing and by examples following later in this guide.
Command List
This is a short list of a few important steam commands usable in macros/scripts. Also with a few short examples.
playmacro
Usage: playmacro 'name of the macro'
Starts a new macro, stopping the current macro.
Example:
playmacro 'Whirlwind'
If
Usage: If condition
Defines a specific condition.
Example:
If poisoned
If buffexists
If not buffexists
If hits <= 250
If yellowhits 'self'
If yellowhits 'enemy'
Endif
Usage: endif
At the end of a defined If condition, to close it.
Example:
If poisoned
cast "Arch Cure"
waitfortarget 3000
target! 'self'
endif
Useskill
Usage: useskill "Skill"
Uses a specific skill.
Example:
ueseskill "Hiding"
Waitfortarget
Usage: waitfortarget time in milliseconds
Inserts a pause between the action and the targeting.
Example:
waitfortarget 3000
Target
Usage: target 'target'
Target self or enemy or friendly target or item.
Example:
target! 'self'
target 'self'
target 'last'
Cast
Usage: cast "Spell"
Cast a spell.
Example:
cast "Arch Cure"
cast "Greater Heal"
Pause
Usage: pause time
Sets a pause between command lines.
Example:
pause 200
Macros: Example Macros
Defensive Healing and Anti Debuff Macro
The following macro will watch your health, your condition via checking if you are mortalled, debuffed or poisoned. It will also use bandies. If you use EasyUO to apply bandages please delete the last command in this macro. Also: Please adjust your hitpoints and other stats, depending on your own stats.
if buffexists "Curse"
cast "Remove Curse"
waitfortarget 3000
target! 'self'
endif
pause 200
if poisoned
cast "Arch Cure"
waitfortarget 3000
target! 'self'
endif
pause 200
if hits <= 200
cast "Heal"
waitfortarget 3000
target! 'self'
endif
pause 200
if hits <= 20
useskill "Spirit Speak"
endif
pause 100
if stam <= 215
cast "Divine Fury"
endif
pause 100
if buffexists "Weaken"
cast "Remove Curse"
waitfortarget 3000
target! 'self'
endif
if "yellowhits" 'self'
cast "Remove Curse"
waitfortarget 3000
target! 'self'
endif
if buffexists "Corpse Skin"
cast "Remove Curse"
waitfortarget 3000
target! 'self'
endif
if hits < 300
cast "Evasion"
endif
if hits <= 180
cast "Counter Attack"
endif
If hits < maxhits
bandageself
waitfortarget 1000
endif
Use Primary or Secondary Weapon Ability Macro
The following macro will watch your health and condition while constantly using the primary OR secondary ability of your weapon. It will also use bandies. Please delete the last command line if you are using EasyUO to apply bandages. Please adjust stats and hitpoints depending on your own stats.
getenemy 'enemy' 'criminal' 'gray' 'closest'
attack 'enemy'
setability 'primary' 'on'
pause '1000'
if hits <= 100
cast "Heal"
waitfortarget 3000
target! 'self'
endif
pause 200
if hits <= 20
useskill "Spirit Speak"
endif
pause 100
if stam <= 210
cast "Divine Fury"
endif
pause 100
If hits < maxhits
bandageself
waitfortarget 1000
endif
This macro is currently using the primary weapon ability. If you want to use the secondary ability, please change the line setability 'primary' 'on to setability 'secondary' 'on.
Use Momentum Strike Macro
The following macro will watch your health and condition while using Momentum Strike. Please delete the last line if you are using EasyUO for bandage healing; adjust your stats in the macro.
getenemy 'enemy' 'criminal' 'gray' 'closest'
attack 'enemy'
cast "Momentum Strike"
pause '1000'
if hits <= 100
cast "Heal"
waitfortarget 3000
target! 'self'
endif
pause 200
if hits <= 20
useskill "Spirit Speak"
endif
pause 100
if stam <= 215
cast "Divine Fury"
endif
pause 100
If hits < maxhits
bandageself
waitfortarget 1000
endif
Defensive Healing and Anti Debuff Macro, including Heal Potions, Mana Potions and Enchanted Apples
The following macro does the same like the first Defensive Healing and Anti Debuff Macro. But it will also use Heal Potions, Mana Potions and Enchanted Apples. Please adjust your stats and delete the last line if you are using EasyUO for healing with bandages. Also read the notes down below.
if not timerexists 'apple'
createtimer 'apple'
endif
pause 200
if not timerexists 'healpotion'
createtimer 'healpotion'
endif
pause 200
if not timerexists 'manapotion'
createtimer 'manapotion'
endif
pause 200
if poisoned
cast "Arch Cure"
waitfortarget 3000
target! 'self'
endif
if hits <= 20
useskill "Spirit Speak"
endif
pause 100
if stam <= 215
cast "Divine Fury"
endif
pause 100
if not timerexists 'healpotion'
settimer 'healpotion'
endif
pause 200
if not yellowhits 'self'
if hits <= 230 and timer 'healpotion' >= 10250
usetype! 0xf0c 0x0 0x4070c498
settimer 'healpotion' 0
endif
pause 200
if hits <= 100
cast "Greater Heal"
waitfortarget 3000
target! 'self'
endif
pause 200
if hits < 375
cast "Evasion"
endif
pause 200
elseif timer 'apple' >= 15600
usetype! 0x2fd8
settimer 'apple' 0
endif
pause 200
if not timerexists 'manapotion'
settimer 'manapotion'
endif
pause 200
if mana <= 30 and timer 'manapotion' >= 35000
usetype! 0xf0c 0x63 0x4070c498
settimer 'manapotion' 0
endif
if buffexists "Curse"
cast "Remove Curse"
waitfortarget 3000
target! 'self'
endif
pause 200
If hits < maxhits
bandageself
waitfortarget 1000
endif
Notes:
This macro uses Serials and ID's to use potions and apples. It also uses ID's for the right containers (bags) the items are stored in. You may have to use the Object Inspector to find the correct Serials and ID's!
Macros: Dress Macros
Dress Macros are necessary to switch weapons and equipment, dress and undress via hotkeys. If you press the key to equip a weapon it will automatically unequip the weapon you are wearing. You can use hotkeys for dress macros to activate other macros: Press the hotkey for the dress macro, and if there is a playmacro command inside of this macro it will equip the item and then start the other macro.
Example:
dress 'champweapon'
playmacro 'Defensive Macro'
Setting up a Dress Macro for all your gear
1. Go to AGENTS TAB
2. Go to DRESS SUB TAB
3. Check the box Move conflicting Items
4. Click NEW
5. Give your dress macro a name (remember this name, you will need it later on!)
6. Click IMPORT: The blank text box will be filled with all the gear and items you are currently wearing!
This macro is to dress everything up; it will dress everything that is not equipped when you press the hotkey.
7. Go to GENERAL TAB and SAVE
8. Go to MACROS TAB
9. Click NEW and name your macro
10. In the blank text box type: dress 'name of your dress macro'.
11. In the next line type: playmacro 'name of your defensive macro' (if you are running such a macro)
12. Choose a hotkey, pass to UO and click SAVE, also SAVE in your profile under GENERAL TAB.
Setting up a dress macro for a single item, for example a weapon
1. Repeat step 1 to 5
2. Click NEW ITEM
3. In game: Target the weapon. (It must be in your hand!)
4. Click SAVE in the GENERAL TAB
5. Go to HOTKEYS TAB
9. Click Agents > Dress and locate name of dress macro (Example: pvp bow)
10. Click dress name to highlight it
11. In the Hotkey box to the right, single click it then hit the key you wish to use
12. When you have your Hotkey picked, check 'pass to UO' box and hit save. Save under General tab as well
13. Repeat all this for every single item you want in a single specific dress macro!
AGENTS
Agents are to help you looting, moving and organizing items. You can activate or deactivate these agents anytime.
AUTO LOOTER
- Set up a container (loot bag), follow the instructions (If you do not set a container it will put all the loot into your main backpack!)
- Insert all the items you want to loot automatically by targeting and clicking each of these items
- Check ENABLE to activate the looter
COUNTERS
- Click INSERT and target and click the items (for example: Arrows, Bandages, Reagents etc.) you want to auto count at all time
ORGANIZER
- Click NEW, double click the name and change it
- Click INSERT and target and click the items that have to be moved from one container to another container
- Set the containers (first target the source container and then the target container)
- Click PLAY to execute or make a macro
- Click stack to stack stackable items
SCAVENGER
- Click INSERT to put the items you want to pick up from the ground into the list
- Set the container
- Check ENABLED
Resizing Game Window in UOSteam
If you are playing with High Resolution and if you want to adjust your game window to another size, you can do this with Steam:
1. Start Steam
2. Log into the game
3. Log out, but DO NOT close Steam
4. Go to the OPTIONS Tab, go to the GENERAL Sub Tab
5. At the bottom right corner: Game Window, check the box and resize the way you want it to be.
By Tys & Falada Updated by Flint & Mal